Versions Compared

Key

  • This line was added.
  • This line was removed.
  • Formatting was changed.


Configurar un dominio para usar el servicio de filtrado de HostDime es muy sencillo una vez que se le informe que el servicio esta activo para su(s) dominio(s)

El proceso se compone realmente de solo tres pasos:

  1. Cambiar los registros MX del dominio para apuntarlo al servicio Premium de antispam de HostDime.
  2. Asegurarse que el servidor/servicio de correo local aún este configurado para recibir correo.
  3. Asegurar que nuestro servicio este excluido de las validaciones SPF en el servidor/servicio de correo local.

Aquí hay algunas instrucciones específicas sobre cómo realizar estas tareas en algunas plataformas comunes.


Table of Contents


UI Expand
expandedtrue
titleWHM

Para WHM

Cambiar registros MX

Ingresar al WHM de su servidor y realiza los siguientes cambios en los registros DNS para el dominio:

  1. Da clic en la opción Edit MX Record dentro de la barra derecha del WHM o bien buscar ese termino en la barra de búsquedade búsqueda.
  2. Busca y selecciona el dominio al cual se le activara el servicio después da clic en Edit.
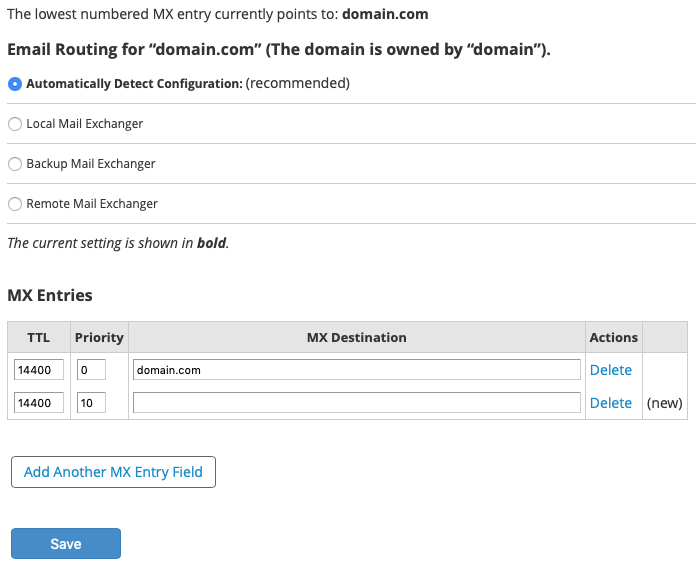
  3. Normalmente, los registros MX apuntaran al dominio o servidor local, como se muestra a continuación:

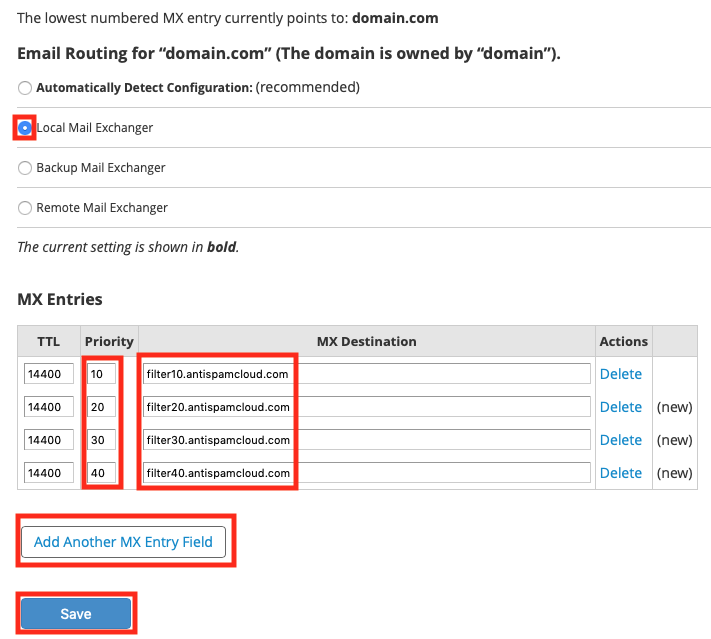
Ahora deberá editar los registro MX de la siguiente forma (cambiando los registros actuales):

  1. Cambio a Local Mail Exchanger dentro de la sección Email Routing.
    Si no se selecciona Local Mail Exchanger, entonces cPanel detendrá de manejar todos los correos localmente y rechazará los correos cuando el servicio de filtrado de correo de Hostdime (SpamExpert) trate de entregar correos para el dominio.

  2. Bajo la sección de  MX Entries section section, debe dar clic en Add Another MX Entry Field tres veces si no se muestran los cuatro campos que se visualizan en la imagen.
  3. Editar los valores en los campos de  Priority donde  donde el menor tamaño se toma como prioritario y conforme se va incrementando se consideran registros de respaldo.
  4. Editar los campos de  MX Destination para  para quede de la forma similar a la imagen que seria con los siguientes valores de prioridad y servidor

    1. Prioridad: 10 Registro: filter10.antispamcloud.com

    2. Prioridad: 20 Registro: filter20.antispamcloud.com

    3. Prioridad: 30 Registro: filter30.antispamcloud.com

    4. Prioridad: 40 Registro: filter40.antispamcloud.com

      Normalmente, if se edita la zona de DNS de forma manualmente, se debe en cada registro registro MX Destination con un punto, pero esto es necesario con la edición de registros MX desde WHM desde WHM or cPanel.

  5. Da clic en en Save para guardar los cambios.

WHM reiniciará los registros o servicios necesarios después de guardar los cambios.
Los registros de correo se cambian de inmediato y muchos servidores de correo ahora comenzarán a entregar correo al Antispam Premium de HostDime, pero debido al almacenamiento en caché, es posible que algunos servidores de correo continúen entregando correo al servidor de correo local por un monto igual o superior a la cantidad de tiempo especificado por el valor TTL (4 horas por defecto).

Disable Local SPF Checks for Our Email Filter Servers

To ensure that clean mail being delivered from our email filtering servers doesn't get accidentally flagged as spam or failed SPF checks, we need to configure Exim (the local mail server) to not run those checks for our service's mail servers. Follow the directions below to accomplish this.

  1. If you aren't already logged into WHM as root, do so now.
  2. Type exim into the search box at the top of the sidebar.
  3. Click on Exim Configuration Manager. This will bring up the Basic Editor.
    Image Removed
    1. Click on the Access Lists tab.
    2. Click the Edit button across from the Only Verify Recipient access list.
    3. A new box will pop up, enter delivery.antispamcloud.com on a line all by itself.
    4. Click the Save button below the box.
    5. Click the Save button at the bottom of the Basic Editor.

Deshabilitar revisión de SPF locales para nuestro servicio de filtrado de correo

Para asegura que el correo limpio sea entregado desde nuestro servicio de filtrado de correo y no sea accidentalmente marcados como spam o rechazado por validaciones de registros SPF, se requiere configurar Exim (el servidor de correos local de cPanel) para no ejecutar estas revisiones en las conexiones de nuestro servicio de filtrado de correo. Se deben seguir los siguientes pasos para completar esta tarea.

  1. Debe ingresar al WHM como root, sí no estas de esa forma es necesario realizarlo antes.
  2. Usando el cuadro de búsqueda de la parte superior derecha escribe exim.
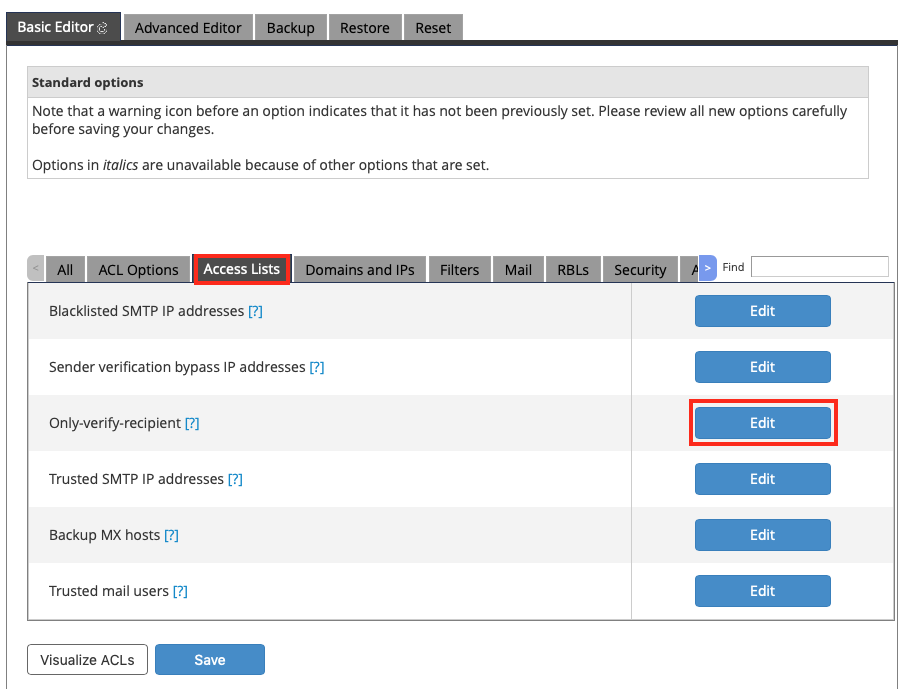
  3. Da clic en la opción de Exim Configuration Manager. Esto se mostrara una interfaz simlsar a la siguiente al seleccionar la pestaña de  Basic Editor.
    Image Added
    1. Da clic en la pestaña inferior de  Access Lists.
    2. Da clic Edit en el botón derecho a la misma altura de la opción de Only Verify Recipient dentro de la pestaña de Access list.
    3. Un cuadro se desplegara donde se debe agregar en una linea delivery.antispamcloud.com sin ningun otro dato en la misma linea.
    4. Da clic en el botón de Save en el cuadro desplegado.
    5. Da clic en el botón de Save en la parte inferior dentro de la sección de la pestaña de Basic Editor.

El servicio de correos Exim será reiniciado y las configuraciones estarán completadas.Exim will be restarted and your configuration is now complete.

Warning
titleProblemas de conexión

Si todavía tiene problemas con Exim que rechace los mensajes de nuestros servidores debido a las comprobaciones de SPF, siga los pasos anteriores, pero pegue la siguiente lista de direcciones IP en el cuadro de Only verify recipient, uno por línea, y guarde los cambios.

Code Block
delivery.antispamcloud.com

También puede verificar el firewall de su servidor para asegurarse de que tampoco bloquee nuestros servidores.


UI Expand
titlecPanel

Para cPanel

It is also possible to change the MX records and routing from cPanel itself for those accounts that have the Zone Editor and Email Delivery features enabled.

  1. Log into the cPanel account that controls the domain that you want to change the mail records for.
  2. Click on Zone Editor in the Domains section of cPanel.
  3. Click on Manage next to the domain you want to adjust.
  4. If there are many records displayed, you can select MX in the Filters section above the list to only show existing MX records.
  5. Most cPanel accounts will have a single MX record set up with a priority of zero, but some may already have more than one record with different priorities set up.
  6. You can either choose to edit the existing MX record(s) or delete them and create new ones, but it is safest to click on Edit.
  7. In the existing record you will want to adjust both the Priority and Destination.
    Image Added
    1. The first MX record should have a priority of 10 (to make the priority match the name of the mail server).
    2. The Destination should be: filter10.antispamcloud.com.
    3. Click Save Record to apply the change.
  8. To add another MX record, click the small down-arrow next to the Add Record button and select Add MX Record from the drop-down menu.
  9. Most fields should already be configured properly, but the Priority for the second record should be 20 and the Destination should be filter20.antispamcloud.com.
  10. Click Save Record to apply the new MX record.
  11. Repeat steps 8-10 to create MX records for filter30.antispamcloud.com and filter40.antispamcloud.com.

    cPanel typically queues changes that may affect the availability of services, so depending on the circumstances it may take up to 5 minutes for the changes made in cPanel to become active. Once that is done, many mail servers will now start delivering mail to HostDime's Premium Antispam, but due to caching, it is possible that some mail servers could continue to deliver mail to the local mail server for up to or just over the amount of time specified by the TTL value (4 hours by default).

  12. Now we need to make sure mail is routed properly on the local server. Click the home icon (which looks like 9 squares) to go back to the main cPanel screen.
  13. Click on Email Routing in the Email section of cPanel.
  14. Click Local Mail Exchanger so that cPanel will continue to deliver mail to the locally configured accounts when it comes in.
  15. Click Change to apply the new setting immediately.

Mail for this domain will now be sent to HostDime's Email Filter service,  it will filter the mail and then deliver the mail to the local server.

You should also disable spam and SPF checks for our mail servers, but for that you (or your web host) will need to log into WHM as root to make some configuration changes. 

To see what those steps are, switch to the From WHM tab above and scroll down near the bottom to the Disable Local SPF Checks for Our Email Filter Servers section and follow those directions.

UI Expand
titleNodeWorx de Interworx

Para NodeWorx como admin de Interworx

The following steps should be handled by an administrator account:

  1. Log into NodeWorx.
  2. In the DNS Server section, select Zones.
    Image Added
  3. Find the DNS zone you want to edit and click the Records button.
  4. Check to see if the zone contains one or more MX (mail) records. On InterWorx, most domains will likely have at least one record with a preference number (priority) of 10.
  5. If at least one MX record exists, Edit the record with the lowest priority number first (which is probably 10). If no records exist, you need to make some. Skip to step 7.
  6. If the lowest priority MX record you are editing is some number other than 10, change the Preference Number to 10 and the Mail Server to filter10.antispamcloud.com. Click Save to save the record changes. If the zone has more existing MX records, repeat this process with filter20.antispamcloud.com filter40.antispamcloud.com for MX records with similar Preference Numbers. If you run out of existing MX records, continue to the next step and continue creating MX records until the zone has 4 of them, total.
    Image Added
  7. Create a new MX record by selecting MX from the Add a new drop-down list to the top-left of the DNS zone records list and clicking Go. Fill in the Preference Number to match the lowest Mail Server record that doesn't already exist and Save changes. Repeat this until the zone has a total of 4 MX records as follows:

    Replace "yourdomain.com" with whatever domain you are editing.

  8. InterWorx will automatically refresh the DNS zone in the DNS service after you add or edit each record.
  9. Now you need to double check that mail is still set to be delivered locally on this server for the domain you just edited. If mail is handled by your InterWorx server, you'll need to log into the SiteWorx account that owns the domain you've just edited. If mail is not handled by your InterWorx server, then the user should make sure their remote mail server is still set to accept mail locally.
  10. Under SiteWorx select Accounts.
    Image Added
  11. Find the user account that owns the domain you just edited and click on the SiteWorx button next to that account. This will immediately log you into the user's account.
    Image Added
  12. In the Administration section, find Mail Options and click Remote Setup.
    Image Added
  13. Under Local Delivery Status find the domain you edited earlier. Make sure that Status is listed as Enabled. If it is enabled, there is nothing you need to do. If it is Disabled, click the Enable button to the left of the domain Host name.
    Image Added
  14. The last step is to try to whitelist our anti-spam servers so they don't get checked for SPF or labeled as spam.
  15. Log out of the SiteWorx and you should be back in NodeWorx again.
  16. Under System Services look for Mail Server and then select Spam Filtering.
    Image Added
  17. Put delivery.antispamcloud.com or the following list of IP in the trusted networks field and click Update to apply changes.
    Image Added


UI Expand
titleSiteWorx de InterWorx

Para SiteWorx como usuario de Interworx

If you are the user who owns the domain you're trying edit, follow these steps:

  1. Log into SiteWorx.
  2. In the Hosting Features section, look for Domains and select DNS Records. If you don't see DNS Records then your account may not have access to edit your DNS zone file. Contact your web host for assistance.
    Image Added
  3. Choose View Records next to the domain name you want to adjust the mail records for.
    Image Added
  4. Check to see if the zone contains one or more MX (mail) records. On InterWorx, most domains will likely have at least one record with a preference number (priority) of 10.
  5. If at least one MX record exists, Edit the record with the lowest priority number first (which is probably 10). If no records exist, you need to make some. Skip to step 7.
  6. If the lowest priority MX record you are editing is some number other than 10, change the Preference Number to 10 and the Mail Server to filter10.antispamcloud.com. Click Save to save the record changes. If the zone has more existing MX records, repeat this process with filter20.antispamcloud.com filter40.antispamcloud.com for MX records with similar Preference Numbers. If you run out of existing MX records, continue to the next step and continue creating MX records until the zone has 4 of them, total.
    Image Added
  7. Create a new MX record by selecting MX from the Add a new drop-down list to the top-left of the DNS zone records list and clicking Go. Fill in the Preference Number to match the lowest Mail Server record that doesn't already exist and Save changes. Repeat this until the zone has a total of 4 MX records as follows:

    Replace "yourdomain.com" with whatever domain you are editing.

  8. InterWorx will automatically refresh the DNS zone in the DNS service after you add or edit each record.
  9. Now you need to double check that mail is still set to be delivered locally on this server for the domain you just edited.
  10. Go to Administration and look for Mail Options and then click on Remote Setup.
    Image Added
  11. Under Local Delivery Status find the domain you edited earlier. Make sure that Status is listed as Enabled. If it is enabled, there is nothing you need to do. If it is Disabled, click the Enable button to the left of the domain Host name.
    Image Added
  12. The last step is to try to whitelist our anti-spam servers so they don't get checked for SPF or labeled as spam. Contact your web host and tell them to follow from step 15 onward in the NodeWorx tab on this page.
UI Expand
titlePlesk

Para Plesk

  1. Log into Plesk.
  2. Make sure mail service is enabled for the domain you want to change.
    1. Click on Domains in the sidebar to show available domains.
    2. Click on the domain name itself to be taken to the Plesk domain management interface.
    3. Click on Mail Settings.
    4. Make sure Activate mail service on this domain is enabled. If not, check this item and Apply changes.
  3. Now we can adjust the MX records for this domain.
    1. Click on Domains in the sidebar to show available domains.
    2. Click on the domain name itself to be taken to the Plesk domain management interface.
    3. Click on DNS Settings and you will be shown a list of all of the DNS zone entries for that domain.
    4. Find the first MX record and click on it to edit the settings.
      Image Added
    5. If needed, change the priority to 10 and set the Mail exchange server to filter10.antispamcloud.com (no period is required at the end of the server record).
    6. Click Apply to save the changes.
    7. Add or edit more MX entries as needed to add priority 20-40 records pointing to filter20.antispamcloud.com — filter40.antispamcloud.com.

Once done, mail will be filtered by HostDime's Email Filter service and then delivered to the local mail server.

UI Expand
titleOtros servidores

If you aren't using cPanel or Plesk, then you will need to look up the proper method for editing DNS records for the server.

  1. Edit the DNS zone for the domain you want to switch to HostDime's Premium Antispam.
  2. Adjust the serial number in the SOA record if you are manually making changes to ensure that your DNS server detects the changes to the zone and starts serving them.
  3. Add or edit MX records for the domain so they point to the following:


    Replace YOURDOMAIN.COM above with the actual domain name to be filtered. Make sure it ends with a period.

  4. Save changes.
  5. Reload or restart your DNS service.
  6. Make sure your local mail server is still configured to send and receive mail for this domain, even though the MX records are no longer pointed to the local mail server.

Now you will want to make sure that delivery.antispamcloud.com or the following list of IPs are exempted from your local mail server's spam and SPF checks (if it does any).

Después de realizar estos cambios, intente enviar algún correo electrónico a su dominio recién configurado. Si tiene problemas, no dude en contactarnos en cualquier momento.


Warning
titleAtención importante

Algunos servidores de correo pueden continuar enviando correo directamente a su servidor de correo durante algunas horas (dependiendo de su valor TTL de registro MX) después del cambio. Esto es normal. Una vez que han pasado varias horas, la cantidad de spam se debe reducir considerablemente.

Además, no es raro que algunos spammers ignoren por completo los registros MX e intenten enviar el correo directamente a su servidor de correo para intentar evitar servicios de filtrado de correo como el nuestro. Si tiene todos los dominios de su servidor filtrados a través de nuestro servicio, contáctenos y podemos ayudarlo a configurar su servidor de correo para permitir solo conexiones de correo entrantes desde nuestros servidores de correo. Alternativamente, siga estas instrucciones para filtrar ese correo no deseado directo solo para ese dominio específico.