You are viewing an old version of this page. View the current version.
Compare with Current
View Page History
« Previous
Version 14
Next »
Configurar un dominio para usar el servicio de filtrado de HostDime es muy sencillo una vez que se le informe que el servicio esta activo para su(s) dominio(s)
El proceso se compone realmente de solo tres pasos:
- Cambiar los registros MX del dominio para apuntarlo al servicio Premium de antispam de HostDime.
- Asegurarse que el servidor/servicio de correo local aún este configurado para recibir correo.
- Asegurar que nuestro servicio este excluido de las validaciones SPF en el servidor/servicio de correo local.
Aquí hay algunas instrucciones específicas sobre cómo realizar estas tareas en algunas plataformas comunes.
En WHM
Para WHM
Cambiar registros MX
Ingresar al WHM de su servidor y realiza los siguientes cambios en los registros DNS para el dominio:
- Click Edit MX Record in the WHM sidebar.
- Select the domain to adjust and click Edit.
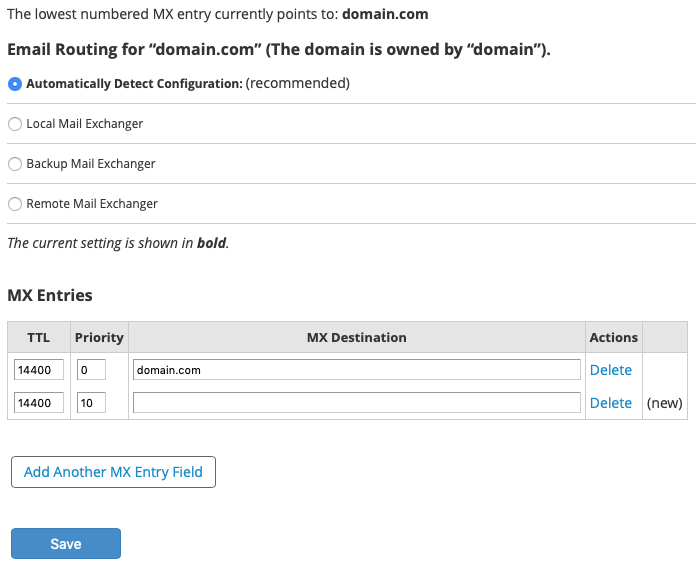
- Typically, the MX records will point to the local server, like this:

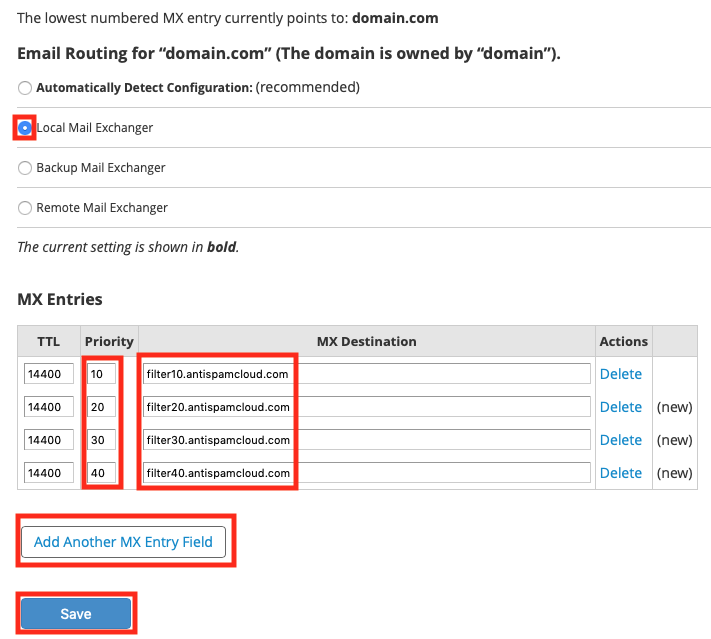
Now you want to edit the MX records in the following ways (replacing the existing records):

Select the Local Mail Exchanger for the Email Routing section.
If you don't select Local Mail Exchanger, then cPanel will stop handling all mail for this domain locally and will refuse mail when Spam Expert's servers try to deliver.
- Under the MX Entries section, click Add Another MX Entry Field 3 times if there aren't already 4 fields being shown.
- Edit the Priority fields so the first record is 10, the next is 20, then 30 and finally 40.
Edit the MX Destination fields so that the priority 10 record is filter10.antispamcloud.com, the 20 record is filter20.antispamcloud.com, 30 is filter30.antispamcloud.com and 40 is filter40.antispamcloud.com.
Normally, if you were editing a raw DNS zone, you'd want to end each MX Destination with a period, but that is not required when editing the record in WHM or cPanel.
- Click Save to commit these changes.
WHM will now reload or restart the DNS server as appropriate.
The mail records are changed immediately and many mail servers will now start delivering mail to HostDime's Premium Antispam, but due to caching, it is possible that some mail servers could continue to deliver mail to the local mail server for up to or just over the amount of time specified by the TTL value (4 hours by default).
Disable Local SPF Checks for Our Email Filter Servers
To ensure that clean mail being delivered from our email filtering servers doesn't get accidentally flagged as spam or failed SPF checks, we need to configure Exim (the local mail server) to not run those checks for our service's mail servers. Follow the directions below to accomplish this.
- If you aren't already logged into WHM as root, do so now.
- Type exim into the search box at the top of the sidebar.
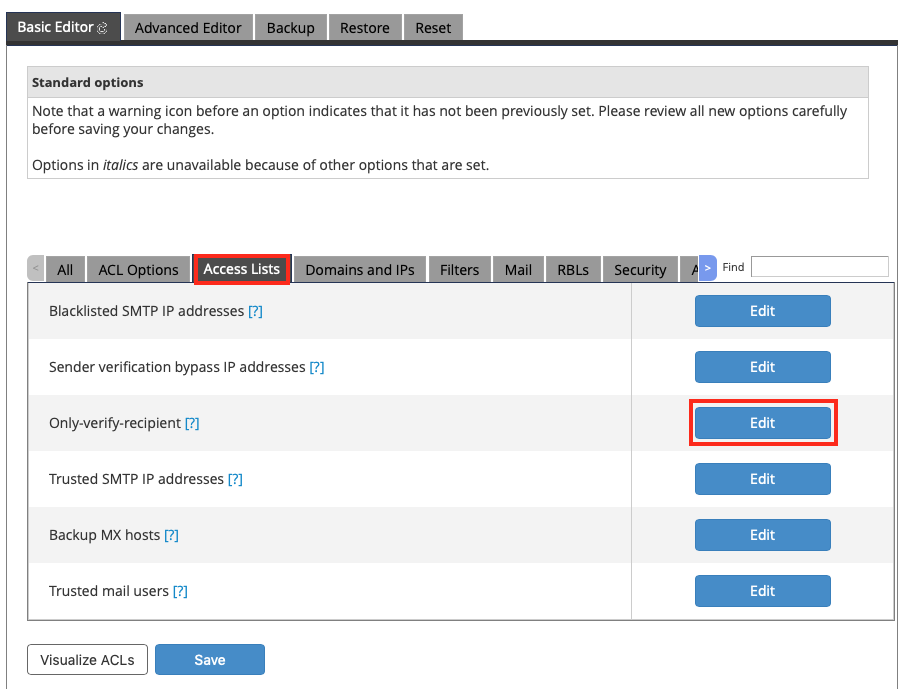
- Click on Exim Configuration Manager. This will bring up the Basic Editor.

- Click on the Access Lists tab.
- Click the Edit button across from the Only Verify Recipient access list.
- A new box will pop up, enter delivery.antispamcloud.com on a line all by itself.
- Click the Save button below the box.
- Click the Save button at the bottom of the Basic Editor.
Exim will be restarted and your configuration is now complete.
Después de realizar estos cambios, intente enviar algún correo electrónico a su dominio recién configurado. Si tiene problemas, no dude en contactarnos en cualquier momento.


